More Reasons Why Shooting in RAW is Good
One of the greatest benefits to shooting in RAW is being able to easily control for abnormal tint in your photos. A common example of abnormal tint is when you take a picture inside your house and objects that are white look kind of yellow instead. Perhaps you have seen settings on your camera to adjust for different kinds of light: daylight, shade, cloudy, fluorescent, and the rest. Perhaps those settings made you wonder…”what is tungsten, anyway?” If you are like me, you are too busy keeping everything else in mind to bother with adjusting these white balance settings in your camera. Even when you do fiddle with those settings, the picture doesn’t always come out the way you had hoped. Like me, you probably just set it to “auto” and hope for the best. One of the great things about shooting in RAW is that it pretty much gets rid of the need to mess with those white balance settings in camera. You can make the adjustments afterwards and the result is exactly the same. Better yet, when editing in RAW you aren’t stuck with those preset settings and you can custom adjust your white balance to your own taste.
The Details
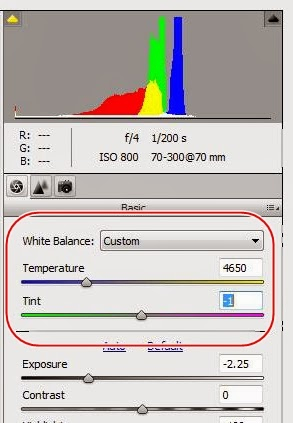
If you are working in Photoshop Elements, like me, then here is a picture of the settings that we are discussing (circled in red). Other programs will have similar settings.
Note that the White Balance drop down list and the Temperature slider are interconnected and will do the same thing. Once you adjust your Temperature (White Balance) then you can use the Tint to fine tune your adjustment, if desired. The White Balance drop down comes with preset temperatures: Auto, Daylight (temperature of 5500), Cloudy (6500), Shade (7500), Tungsten (2850), Fluorescent (3800), and Flash.
I like to have a little more control and so I use the Temperature slider. In the above example, I wanted a cooler temperature than Daylight (5500), but warmer than the Flourescent (3800). When I put the slider at 4650, you will notice that the White Balance box now reads “Custom”.
As mentioned, use the Tint slider to fine tune your colors a bit further. Careful not to adjust Tint too much or you could end up with a picture where everything looks purple…unless that’s what you’re going for…not that there’s anything wrong with that…
When To Use
All of the time. I almost always play with the Temperature/White Balance just a little bit when processing photos. This is one of the most common edits I make. However, I hardly ever touch the Tint.
Here is a picture I took the other day when I was trying to get some ideas to practice some minimalist shots. When I opened the RAW file, the Temperature was 3400 and the Tint was automatically at +25 (my camera’s white balance settings were on auto). The light was poor and you can notice a yellowish-pinkish tint on the tub and walls. It came out too “warm” for what I had pictured in my mind.
Below is the same shot where I cooled the temperature down to 2750 with the Temperature slider. The color was still just a bit off, so I moved the Tint down to +10. No other changes were made. From here, I might play with the exposure, contrast, etc., but we’ll talk about those things another day.
Portraits: I will always adjust the Temperature/White Balance keeping the subjects’ skin tone in mind. With this adjustment, I tend to ignore the sky and other things. Let’s face it, people want themselves to look good in pictures. Making the skin tone look good when adjusting the temperature is key.
Winter Shots: If you are taking pictures in the snow, the shots will almost always have a cool blue tint to them. You can make the snow look whiter by warming up the temperature a bit.
Sunsets and Starry Skies: It is amazing the amount of difference you can make to these scenes by simply adjusting the color temperature. Here is a before/after comparison of a sunrise photo of Pike’s Peak in Colorado. The blue sky really comes out with just a slight decrease in color temperature.
Wrap Up
By shooting in RAW you don’t have to think about your in-camera white balance settings. Just set it to auto and then adjust with much greater control during processing. Think about making white balance/temperature adjustments as one of the first things you do to process a photo. Use the Tint adjustment sparingly.
Next week: Exposure and Contrast
Do you have any success or horror stories? Feel free to post your comments and questions to this post and I’ll be happy to discuss them. Happy shooting!
Bryan Rasmussen is a landscape/nature photographer at heart, although he has been known to include people in his photos from time to time. He owns Chiseled Light Photography and is also a freelance photographer for a local newspaper. Check out more of his work at chiseledlight.com and follow him at facebook.com/ChiseledLight. He is also on Instagram, Flickr, and Fine Art America.