Today we welcome back photographer and guest contributor, Joseph Prezioso. He has written many informative and inspirational articles including Inside a Photographer’s Camera Bag, Why I Love the Pentax 645 System and Traveling and Film Photography. His article today provides a photographer’s input on the essentials of lighting. (Please click on the images below to enjoy a larger version).
Without light there would be no photos. Light is what creates our images, bouncing from the sun or artificial lights to our subjects. From our subject, the light then bounces onto our lenses and finally onto our negative or sensor. Sometimes the sun is not enough, and at other times there is no sunlight at all to work with. Understanding light, the types of light and how to add or subtract light can greatly improve your photography.
 |
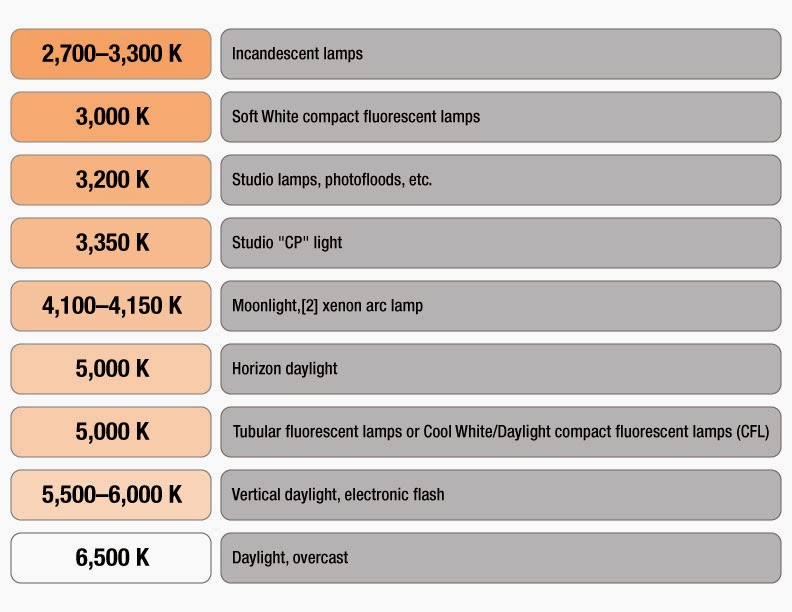
| Sources of Light and Color Temperature |
Most films are daylight balanced, so they are meant for light at around 5000-6500K. This is why when you shoot indoors with incandescent lights your images look orange or red. It’s because of the lower color temperature. With digital you simply change your white balance, but with film you have to either shoot a tungsten-balanced film, such as Kodak’s Vision Three 500T or 200T, or use flash to correct for the color or correct in post-production.
 |
| © Joseph Prezioso |
Generally speaking, shooting in the sun in full daylight is easy. The biggest thing most photographers don’t know is how to properly measure light. This is where a light meter comes in. A light meter by manufacturers such as Sekonic or Minolta will let you take ambient light readings so that you can set your camera correctly for the look and exposure you want. I always shoot with a light meter, even when I shoot with a digital camera. Looking at your LCD is not the best way to judge your exposure, and with film there is no LCD, so it’s important to get your exposure right. In-camera meters are great, but they can be easily tricked. A light meter is much more accurate.
 |
| © Joseph Prezioso |
When shooting outside in full daylight, the easiest way to get your exposure is to you the Sunny 16 rule. This rule works for all cameras, film or digital. It’s an easy rule to follow, and as long as sunlight is available it will work. The rule goes like this; for whatever film ISO you’re shooting at, set that as your shutter speed. For example, ISO 100 would be 1/125th, ISO 400 would be 1/500th and so on. Then, set your aperture for the sunlight. Full direct sunlight hitting your subject is f16 or f8 if the subject’s back is in the direct sun. Partial shade would be f5.6, and darker shade would be f4 or f2.8. An overcast bright day would be f11 or f 8, and a dark rainy day usually works at f4 or f2.8.
 |
| © Joseph Prezioso |
So where does a light meter come into this? Well, many times I am shooting inside with bounced light from windows or in an alley where we are in the shade of many tall buildings. There are many light sources mixing, and it’s hard to tell what the exposure would be. I like to shoot slide film for my fashion work, so I need to get an exact meter reading for my model’s face. To do this, I simply use my light meter and hold it up near the model’s face in the light that’s hitting them and measure it. I don’t want a reading for the entire scene, just the face.
 |
| © Joseph Prezioso |
When I shoot indoors, at a church, or in a function hall, I like to know what the light is like before I start shooting the event. To do this, I simply do a quick walk around the area with my light meter set for the ISO I will be shooting at and take readings for all the places my subjects will be. Doing this before I start shooting lets me know the exact exposures I will need once I start shooting so that I don’t mess up a shot with the wrong exposure.
 |
| © Joseph Prezioso |
In many locations it’s just too dark to shoot with the available light, or I need more light to evenly light a group of people at a higher f-stop. At times like these I bring out my studio strobes or speed lights. I set them up on light stands, set the power level I think I need, and then I walk out to where I will be shooting and use my light meter to measure the exposure. If I am doing a large group shot and want to shoot f8, I will plus or minus the power on my strobes to get that f8 evenly across the area I will be shooting at. Without the meter I would not be able to get accurate readings. You could take test shots with a digital camera and look at the LCD, but I would rather have the lights all set and not have to waste my client’s time with test shots. I want my lights and camera ready to go.
 |
| © Joseph Prezioso |
For other times, like at weddings when I am bouncing a flash, it becomes a little bit trickier. Let’s say I am shooting Portra 400 at an ISO of 1250 with my Nikon F5, and on top of my camera I have a Nikon SB-80DX flash with a Stofen attached to it. Do I use TTL or do I put my flash in manual mode? I go manual. I know that if I set the power of my flash to 1/32 and have a shutter speed of 60th that my flash will bounce enough light a normal ceiling height to illuminate my subjects with an f-stop of about 1.4 to 1.8 at about 5 feet out. If I want more of a depth of field I simply pump of the flash power. If I am shooting in a high ceiling in a large function hall I will take off my Stofen and rotate my flash to go over my left shoulder and up to the ceiling at a power of 1/8th to 1/4th depending on how far away the ceiling and my subjects are.
 |
| © Joseph Prezioso |
This is of course after I take an ambient reading with my light meter in the room. So if the dance floor is a 30th at f1.4 and I want to be at a 60th at f2, then I know I need to add light. I can measure this light before hand with the strobes as well. I can have my assistant stand where I will be shooting and fire my flash while I stand with my light meter where my subjects will be and take the reading. Once you get to know your flash and its power levels, you won’t have to meter all the time. You will get to know how much light you need to bounce to get the proper exposure.
 |
| © Joseph Prezioso |
This also works for LED lights and hot lights. Simply set them up where you want them, stand where your subject will be and take a reading with your light meter. When the action starts, you won’t have to worry about getting your exposure correct. You will already have it locked in and ready to go.
 |
| © Joseph Prezioso |
Depending on what type of film or digital you’re shooting will determine how you use your light meter to measure the light you will be shooting in. Everyone has his or her own style and way they want their images to look, so experiment with your light meter. Practice how you meter your subjects to see how the different techniques yield different exposures. When I shoot color negative film, I meter for the darkest part of my subject. I am not worried about the highlights because I know the negative can handle over exposure, and I want to get good shadow detail. This means if I were holding my light meter in front of a model in normal light without a flash, I would hold it up to their face with the bulb pointed down. If I were shooting black and white film or slide film, I would meter for the mid-tones and hold the meter straight at the lens. For digital, I would meter for the highlights so they don’t get clipped. With a flash, I meter for where the flash will be hitting the subject so it won’t it be too dark.
 |
| © Joseph Prezioso |
A light meter is your key to getting accurate exposures in all light.
Contributor Bio: Joseph Prezioso is a professional photographer who has been shooting for over twelve years. He went from shooting film, to 100% digital, and then back to film again. He says, “By trade I am a wedding photographer, I shoot over 30 weddings a year and this year they were all on film. My career started as a newspaper photographer though. I was 16 and like Jimmy Olsen. I learned on the streets shooting next to veteran photographers for the AP and Boston Globe (I worked for some weeklies, but I got to cover a lot of cool events that the big news guys covered too!). Film is something I have fallen in love with, it’s the medium I learned on. Film will always be something special to me. It feels more versatile and creative in my hands than when I am using digital.”

