Capturing Movement
Many people have asked about the focusing accuracy of their camera/lens combination. Camera manufacturers have promised that their model can predictably focus on moving subjects such as race cars, but the camera you take home doesn’t seem able to keep up with your seven year old on the soccer field.
As with most things, the answer is complicated. Probably the easiest part is understanding that the race car is on a track and its movements are pretty predictable, completely unlike your seven year old, much less your seven year old on a soccer field.
There are some things you can do to improve the chances of capturing movement. The easiest way to improve your action photography is to understand the subject you are photographing and predict the most likely movement direction. If you know where your subject is likely to be going, then you have a much better chance of keeping your focusing sensor on that subject.
Almost all cameras use contrast to detect focus. If you wear glasses or contacts this is easy to comprehend; without your glasses everything appears soft. In a simplified analogy, the focus sensor(s) on your camera drive the lens mechanism until the highest level of contrast is achieved. On newer and more advanced cameras, the software is sophisticated enough that as the lens is approaching maximum contrast the command to stop is already being sent to the drive motor. As well, the lenses with USM or Silent Wave Motors, to call out two proprietary names, are better at fast focusing because when the power to the drive mechanism is turned off, they stop moving which allows greater precision and far less re-focusing to correct over travel by the lens.
Understanding that your camera is looking for maximum contrast will help you achieve sharp images of the subject you want sharp. A simple example would be that putting a focusing sensor on your seven year olds forehead or cheek doesn’t provide a lot of contrast and hence, very slow to no focus. It is extremely frustrating if you have two seconds to grab a candid portrait and the camera won’t focus. Instead, if you put the sensor on your childs eye, you do two smart things; first the camera now has some contrast to focus on, and second, your portrait now has a tack sharp eye, which vastly improves the impact of a portrait.
Focusing Sensors
Speaking of focusing sensors, the most accurate sensor in any camera is the center sensor. Also, if your subject is moving fairly quickly, then turning off most of the other sensors in your camera gives your camera more processing cycles to react to your seven year old and their random movements. Some of the more advanced cameras allow you to group your focusing sensors into blocks that work together. By joining sensors, you have a bigger area looking at your child, so if one sensor sees a low contrast jersey, another in the group will see the high contrast numbers and allow the camera to continue focusing.
Focusing Modes
It is probably appropriate to discuss what other focusing options are on your camera.
Virtually every camera model gives you three additional options when choosing how to use the focusing tools on your camera. The first to consider is “S” of single. What single does is maintain the original focus point as long as you keep your finger on the shutter release or another button you use to initiate auto-focus. This tool works best in two very broad situations. Situation one is where none of your focusing sensor falls conveniently on what you most want to be in focus. So, select single, put the sensor on what you do want to be sharp, press your shutter release partially to focus the camera, and when it chirps or blinks to tell you that focus has been achieved, then reframe the image to better suit your needs while keeping pressure on the shutter. When you frame the image just the way you want, then push the shutter release completely to make the exposure.
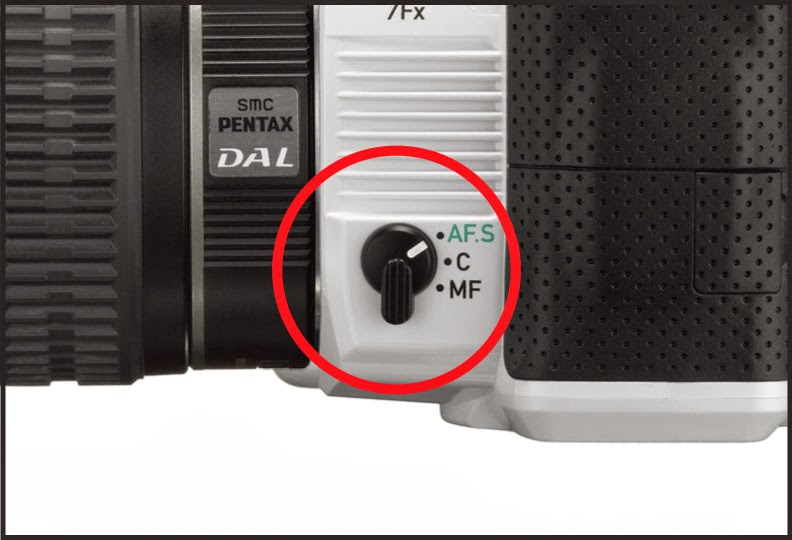
 |
| Focus Mode Selector |
Many cameras also have a focus lock button, which will do the same thing if your shutter release is too sensitive to keep pressure without exposing an image that is not optimally framed. Situation two is when you know that something interesting is going to happen and you want to be ready. Think of a birthday party, and when you know the birthday girl is going to get something absolutely fabulous. So, lock focus on your soon to be ecstatic friend and wait for the expression you are waiting for. If you have locked in focus and exposure, then your camera doesn’t have to “think”, so the shutter will fire almost instantly. Using this technique you will get the image you see rather than the expression that occurs 2/10 of a second later.
 |
| AF Lock Button |
Your camera also has a “C” or continuous auto-focus mode. In this mode the camera is always refocusing as you or your subject moves. Again, like most things in life, the more advanced (expensive) your camera, the quicker it will predict where your subject will be when the shutter fires. This mode is never perfect and will fail somewhat often. To improve your chances of getting most images in sharp focus, you can do several things. Put your central sensor on the subject you most care about while lightly pressing the shutter release prior to wanting images. You are giving your camera time to compute what subject you want, and how fast and in what direction it is moving. When the events happen that you expected, push the shutter release fully while keeping the main subject on the central sensor and keep it there through all the action. If you shoot thirty frames, you will have a good number of sharp action filled images. When you start and stop focusing, invariably the action that you most care about will occur when your finger is off the shutter release. Memory is cheap, images can be deleted, please do not be afraid of too many images.
The last option frequently encountered is the A or auto setting. In this mode the camera decides when to switch from the single to the continuous setting based on the camera sensing motion. It works, but a considerable delay happens before the camera switches to continuous. If you are mostly shooting a quiet subject who then bursts into motion, the A mode will allow you to capture the motion eventually. Early digital cameras lacked this mode, so if your model doesn’t have an automatic option, then just be aware of how your camera switches from “S” to “C”.
On almost all of the newer models of SLR’s today, the center sensor is a cross type sensor. A cross sensor will be able to see horizontal as well as vertical objects, and is far less likely to lose focus and start hunting for something else to focus on. If you are using an older model that does not have a cross sensor, then just by rotating the camera a little you can frequently assist the sensor in picking up something it can recognize. Again, as you go up the food chain, the newer more advanced (expensive) models have more cross sensors and give you more options to group blocks of sensors together to improve focusing accuracy and speed.
 |
| Cross-Type Sensor |
Back Focusing Test
All right, you have taken to heart all of the above, you know your sport, you put your best sensor on an area of high contrast, and your images are still a little unsharp even when you have minutes to focus accurately on your subject. There could be several reasons for this. If your camera is brand new, then it is possible that it was manufactured slightly out of tolerance so that the sensor is right, but located just enough out of place that everything is just not quite accurate. Especially if your images that were shot at F11 are sharp but your images at F3.5 aren’t.
How to tell? At KEH we have a tool that we focus on from a fixed position and it will tell us if the camera is focusing in front or behind the main target. You can do something similar at home by setting up a test. Put your camera on a tripod or some other fixed position that takes you out of the equation. Now, put something ruled like a yardstick at a 45-degree angle in front of the camera, one to three feet away (close focusing is more critical of mistakes than those on far away subjects). Mark a point in the middle of your measuring device and focus your camera on that. You will want to be in A or aperture priority mode, and select the largest aperture (smallest number) that your camera allows. Focus carefully on the mark and take a picture using your self-timer or cable release to take any movement you might make out of the process. Repeat this at the next whole aperture until you get to F8 or F11. The aperture series is 1.4, 2.0, 2.8, 4.0, 5.6, 8, 11, 16, 22, and 32 on most camera systems. Your lens may start at 1.8 or 3.5, or some middle number; just proceed to the next largest number in the series until you reach F8 or F11. We don’t need to go farther than that, as depth of field will cover all but the greatest errors by then. Next, load these images into your computer and see where your camera focuses. Ideally, that mark you put on your stick is sharp as a tack and everything above and below it gets gradually less sharp. If this is not the case, and you have a newer professional or advanced amateur camera, then keep in mind that most allow you to fine tune the focus of your lenses in the menus. Check your instruction manual for whether your model allows this, and if so how to proceed.
~ Don Dory